How to dual-boot Kali Linux and Windows 10 in a UEFI System
Many of us are not familiar with the term UEFI, even I have heard the term and came to know about it yesterday when I was stuck solving a problem. It was last night at around 2 am, I figured out the problem, and one from many of the solutions I mapped to try, worked!
My laptop came pre-installed with Windows 10. I decided to install Kali Linux and wanted it to dual-boot with Windows 10. I installed it and rebooted my system, but the grub_bootloader failed to turn up. Tried out many different techniques and solutions but nothing worked. At last, this below-mentioned way dropped me to my destination successfully.
So, first let me help you understand what UEFI and BIOS is and, what is the difference between them.
UEFI stands for Unified Extensible Firmware Interface and BIOS stands for Basic Input/Output System. They both are firmware interfaces for computers that work as an interpreter between the operating system and the computer firmware. Both of them run at a computer startup to initializes the hardware components and start the operating system. A slight difference between them makes UEFI more advantageous over BIOS. UEFI does the same task as BIOS do, but a little differently. It stores all the information about initialization and startup in an .efi file instead of the firmware. This file is stored on the hard drive inside a special partition called EFI System Partition (ESP). The ESP partition will also contain the boot loader programs for the Operating System installed on your computer.
BIOS uses the Master Boot Record (MBR) to save information about the hard drive data while UEFI uses the GUID partition table (GPT). The major difference between the two is that MBR uses 32-bit entries in its table which limits the total physical partitions to only 4. Each partition can only be a maximum of 2TB in size, while GPT uses 64-bit entries in its table which dramatically extends the support for size possibilities of the hard drive.
BIOS shows have few limitations. UEFI breaks out of size limitations, has better performance, speed, security than BIOS. Therefore, UEFI is meant to completely replace BIOS in the future and bring in many new features and enhancements that can’t be implemented through BIOS.
I hope it is clear by now what is UEFI and how it works. So, let’s get into how to dual boot Kali Linux and Windows 10 and as you are going to install it in a UEFI system the installation procedure will be different.
How to dual-boot Kali Linux and Windows 10 in a UEFI System?#
Requirements:-#
- Active Internet connection
- USB drive (4GB)
- Rufus to make a boot-able USB (https://rufus.akeo.ie/downloads/rufus-2.12p.exe)
- Kali Linux ISO
- UEFI system (obviously, if you don’t have UEFI system, you can just install it normally)
- Your free time!
Follow the instructions below:
- Download Kali Linux ISO from https://www.kali.org/downloads/
- Download Rufus and make a bootable USB with the Kali Linux ISO you just downloaded in step 1. Follow the instructions here, if you don’t know how to make a bootable USB.
- Create a folder /EFI/Boot in the bootable USB you made.
- Download bootx64.efi, MokManager.efi and grubx64.efi from here: http://ftp.scientificlinux.org/linux/fedora/releases/18/Fedora/x86_64/os/EFI/BOOT/ then put them into /EFI/Boot folder you created in step 3.
- Download the file from this link: https://drive.google.com/file/d/0B-hvo82jrNckTnFWVHhRZEdyMEU/view?usp=sharing and put it in the folder /EFI/Boot along with the other three files mentioned in step 4.
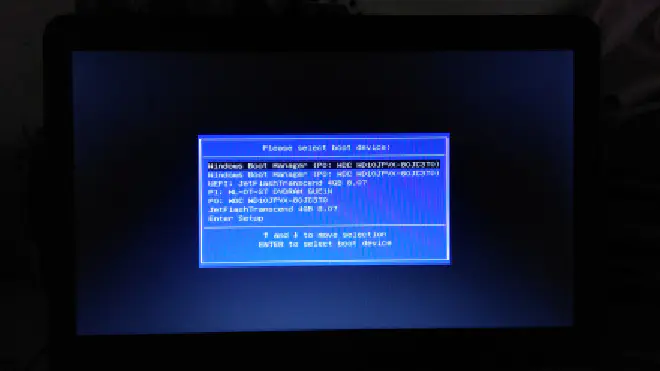
- Disable Secure Boot and Fast Boot in BIOS but enable UEFI or EFI Mode. Select the UEFI option in the Boot option (see picture below) that pops up when you press F2/escape/F10.
Now, continue with your Kali Installation. If you don’t know how to install Kali then refer to this video (https://www.youtube.com/watch?v=ZSdz_wITst8). Just watch the installation part till 10:33 min.
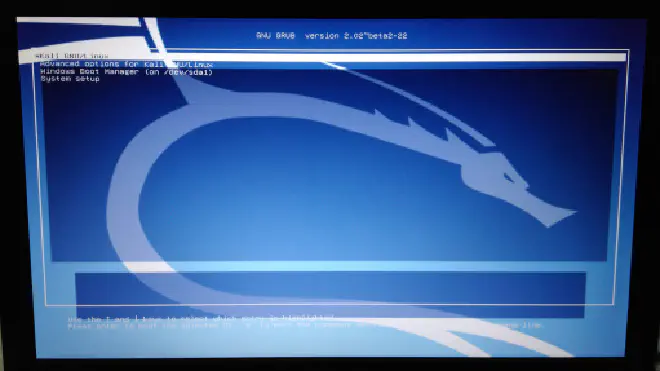
After installation successfully completes, on the next boot you will have the bootloader asking you to select whether to go to Kali or to Windows 10. It will look like this:
Tada! You are done with it.